FabFilter Pro-Q 3 Review
- August 22, 2022
- by Steve Castellano
- Product Intelligence Report
I’ve written before about the various roles of equalization and its fundamental importance in audio production. The concept of equalization is practically as old as audio recording and playback circuitry itself – though parametric equalization has only been around a half century or so. The natural result of decades of evolution is a dizzying variety of hardware and plugins – from vintage gear, prized for its ability to impart a unique “vibe” to a track, to complex mastering EQs, sought after for their precision and transparency.
But if you had to choose just one EQ from among those many options, what would it look like? I’d likely set my vintage emulations aside in favour of something clear, precise, and flexible – all attributes that have made FabFilter Pro-Q 3 a favourite of mixing and mastering engineers alike. And once you start looking beyond the initial appeal of its approachable user interface and curve-sculpting power, Pro-Q 3 offers a wealth of advanced features that can help improve any mix, whether you’re a novice or a seasoned pro.
The big picture
The first thing you’ll notice when you launch an instance of Pro-Q 3 is the large (resizable) work area, home to the Spectrum analyzer and your EQ curve. Menus and controls are contextual, and remain unobtrusive when in view, so you always have a complete picture of the work at hand. This UI approach, as well as the intuitive click-and-drag method of inserting EQ bands, is shared among most FabFilter plugins, meaning if you already own their Pro-R reverb or Volcano 3 filter plugin, for example, your already minimal learning curve is even shallower.
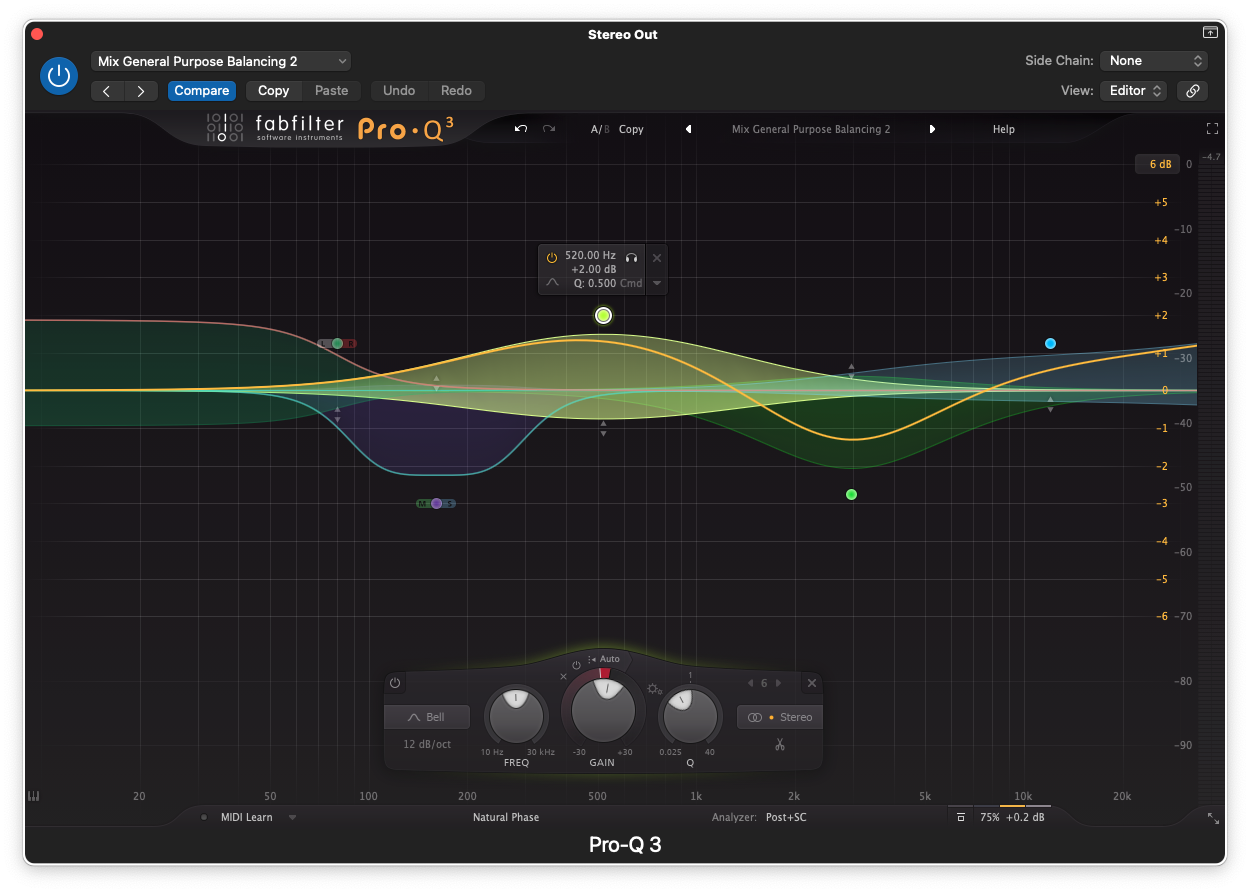
Adding a new band is easy. Double-click (you can also Command-click on Mac or Ctrl-click on PC) anywhere in the display to create a band, then drag vertically to adjust gain or horizontally to adjust frequency. You can adjust the Q setting with the mouse wheel, or by Command-/Ctrl-dragging. Hovering over a band pulls up a floating palette, where you can enter precise values from your keyboard and choose from 9 available curve types and slopes. These range from 6 to 96 dB/octave, with brickwall options for high and low shelf.
Clicking on the handle for each curve brings up a persistent control palette at the bottom of the window with large knob-style controllers for the selected band (plus all the features of the floating palette). These controls will automatically jump to whatever new band you select or create, and can be hidden with a Command-/Ctrl-click. You can add up to 24 bands to a single curve, and each individual band can also be dynamic.
Dynamic EQ
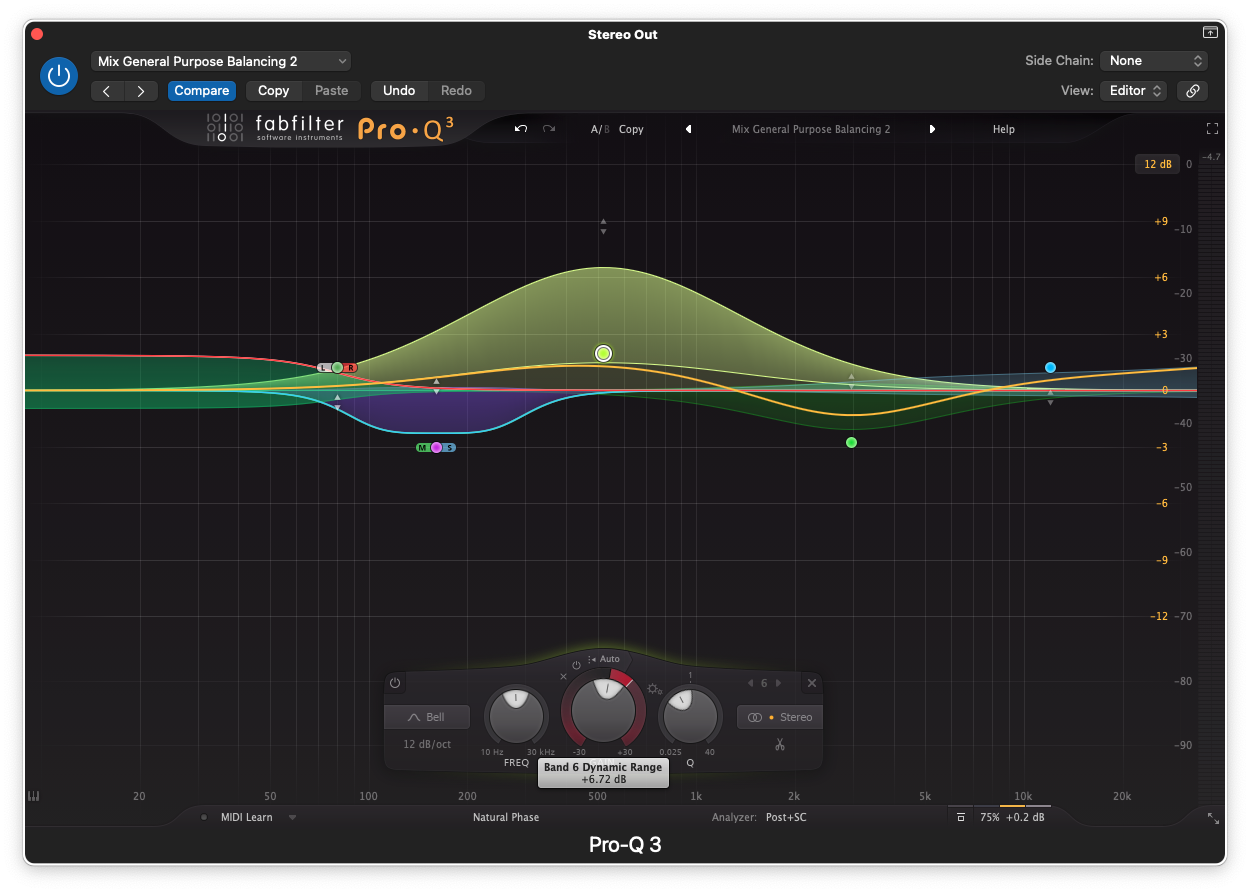
While the concept of Dynamic EQ is a little more involved than traditional EQ, the process of adding dynamic bands in Pro-Q 3 is quite easy. Simply hold down Alt while double-clicking to create a new dynamic band on the curve. Or, to make a static band dynamic, adjust the ring around the main gain knob for the band. Performing either of these actions will reveal additional controls including delete, bypass, and an Auto-threshold toggle. The threshold of your dynamic band defaults to automatic, but turning Auto-threshold off reveals a vertical fader for setting your own. Through this progressive unfolding of controls, Pro-Q 3 elegantly keeps your interface as clean or as detailed as your needs dictate.
Analyze this
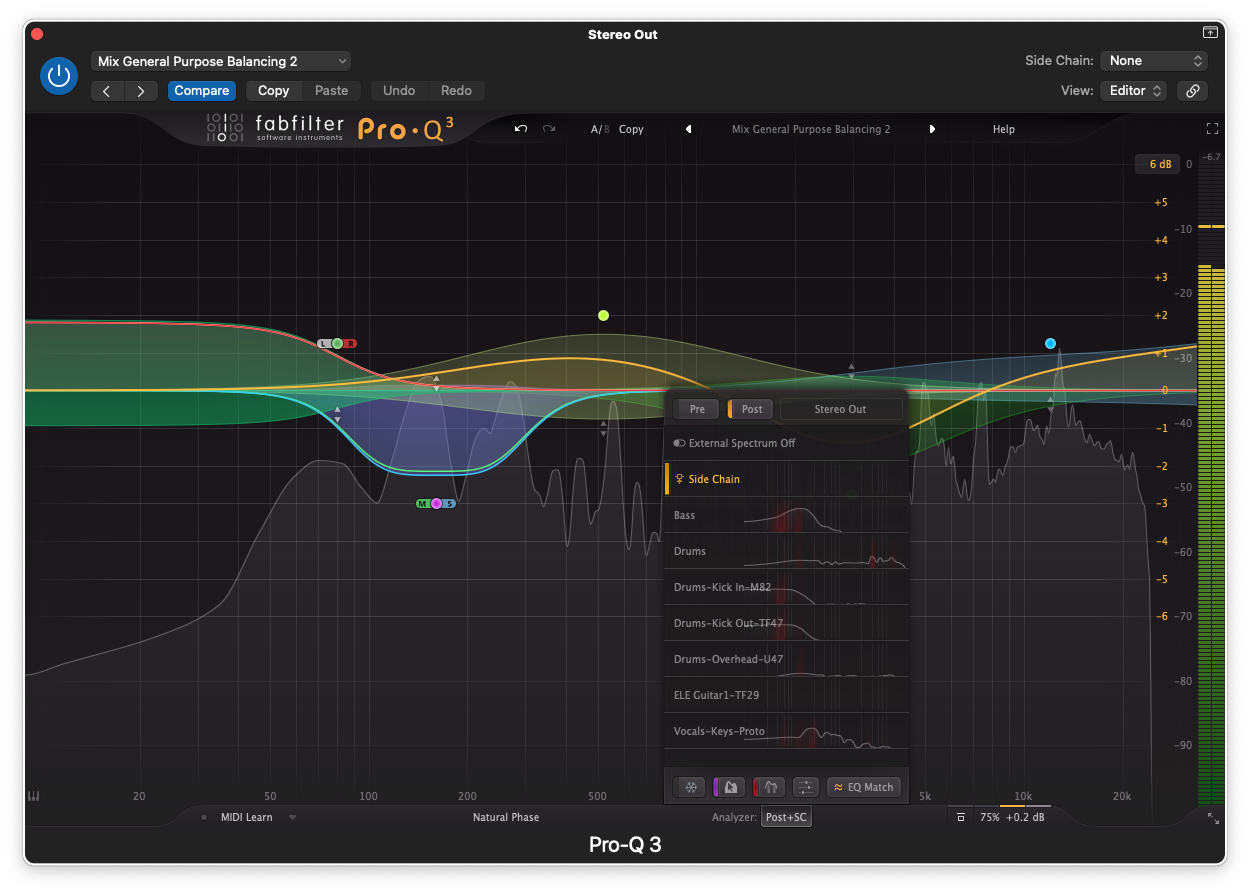
Pro-Q 3’s Spectrum analyzer offers a wealth of insight into your tracks compared to my DAW’s stock analyzer. You can choose to view your spectrum pre-EQ, post, or both at once. You can also superimpose the real-time spectrum from another instance of Pro-Q 3 running on another track – hovering over or clicking the analyzer button at the bottom of the window pulls them up in a menu – or you can pull in the spectrum of any other track via sidechain.
In addition to being a metering tool, the spectrum analyzer is an interface element that provides quick access to some of the plugin’s deeper features. When viewing the spectra of two tracks at once, you can turn on Show Collisions. This feature identifies areas of frequency overlap between selected tracks with a gentle red glow, making it easy to spot and fix potential masking issues. These collisions are highlighted in the main analyzer view as well as the track listings in the Analyzer menu, giving you a quick thumbnail view of these collisions across your mix.
Freeze and reach for it
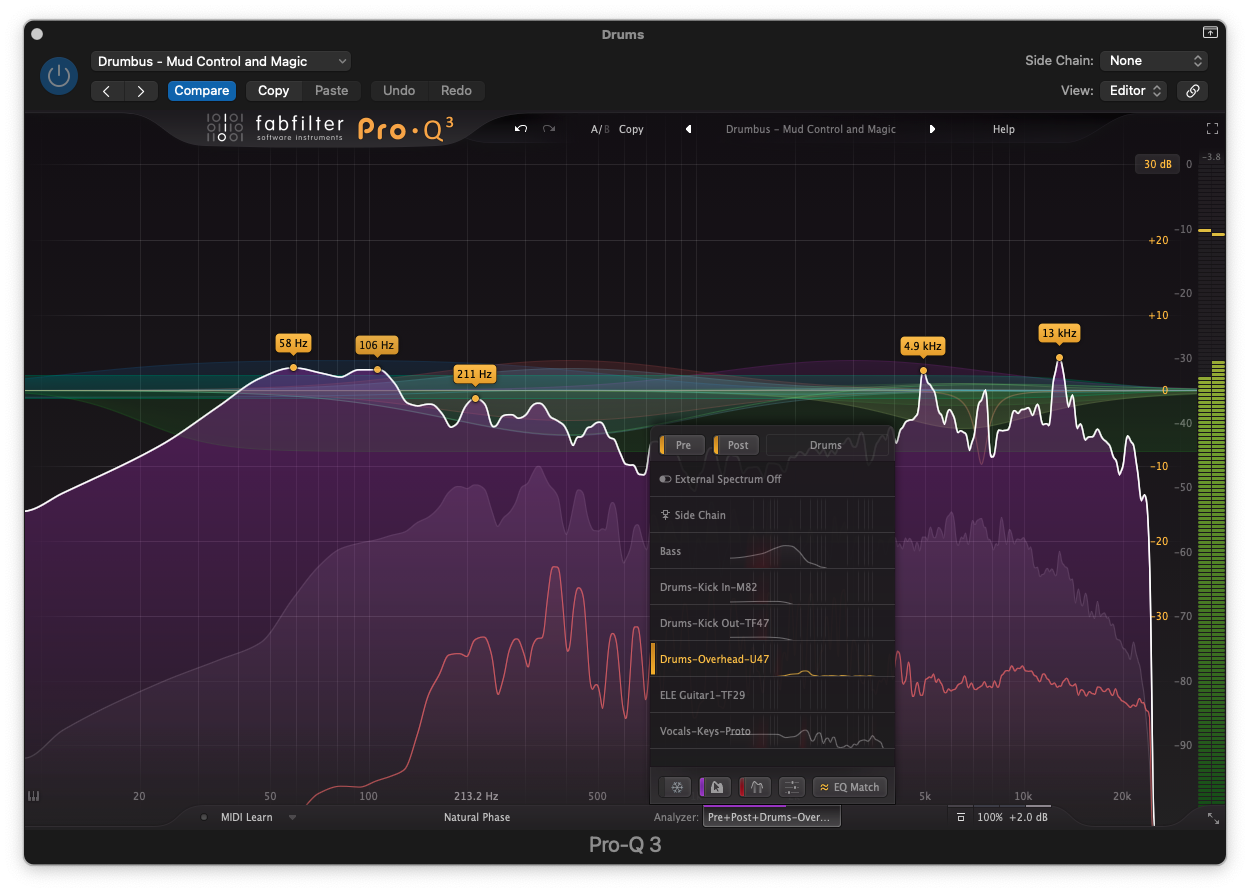
In the bottom left corner of the Analyzer palette you’ll find the Analyzer Freeze button, which “freezes” the analyzer display, allowing you to see the cumulative effect as various frequencies add up over time. This gives you a view of a kind of sonic footprint for your track or bus, and can be very helpful in identifying frequencies you may want to tame, particularly with dynamic EQing if the peaks are more transient than persistent.
Taking this concept even further is the ingenious Spectrum Grab feature. Turning this option on and then moving your pointer over the active Analyzer display creates a white outline around your spectral profile, which not only applies a cumulative freeze effect, but also identifies peaks by their specific frequencies, highlighting them with a yellow-orange dot and frequency label. You can now grab that dot with your pointer and drag it down into submission, which creates a new EQ band which you can now edit and fine tune at will.
For your reference
A logical evolution of the time-honoured “reference track,” EQ Matching is an innovation with a variety of applications. Maybe you’re comparing the spectrum of your current project to that of your favourite track from the genre, or trying to incorporate takes from different sessions into one track. With Pro-Q 3, you can match to any track in your mix – through any instance of Pro-Q 3 on other tracks or buses, or through the sidechain input (very much like how you would look for collisions between tracks). You can also save references from any other session or previously recorded material and create your own library of reference spectra to load up as needed.
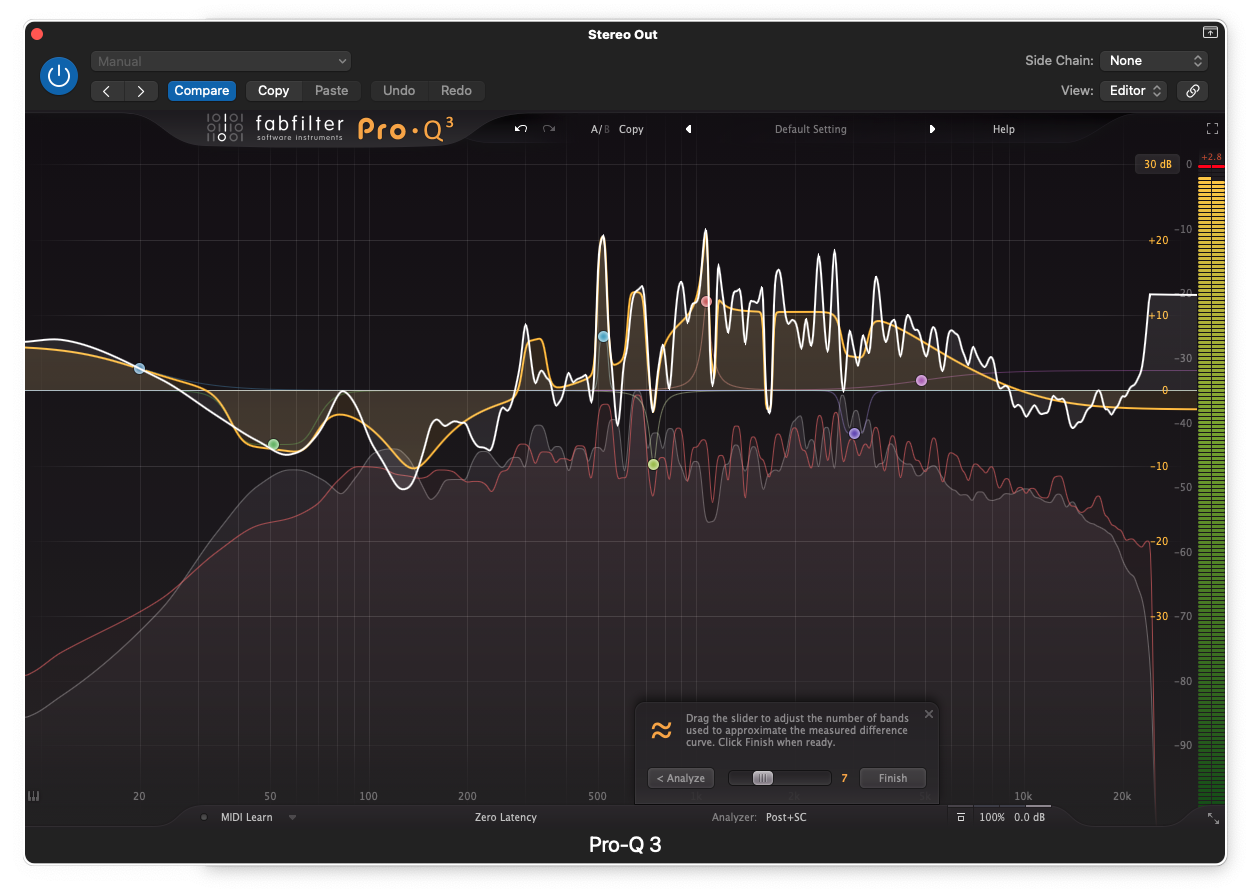
Creating a reference is easy. Click the input button to have Pro-Q 3 “listen” to the material for as long as you feel you need (usually as long as it takes for the cumulative spectrum to stop changing dramatically). Then, save this input as a reference spectrum. To create an EQ-matched curve, open an instance of Pro-Q 3 on your target track, hit EQ Match, and select your reference curve from the menu to begin the analysis. Hit Match to see the recommended curve – the match engine will suggest what it thinks are an appropriate number of bands, which you can adjust up or down if you prefer. Hit Finish to apply the curve and adjust manually to your taste.
Conclusions
I could go on at length about features I haven’t touched on yet: the piano display, which allows you to “tune” EQ bands to the key of your track, the ability to solo individual bands for detailed listening, mid/side and surround processing, and your choice of zero latency, natural phase, and linear phase processing among them. But the main takeaway from my time with Pro-Q 3 is this: it does just about everything I could imagine needing an EQ plugin to do, and then some. Its well-designed interface is friendly and accessible for novices, while still offering the fine control and flexibility that professional engineers demand. That’s no small feat. It only took me one session with Pro-Q 3 to understand why it's on so many “desert island plug-ins” lists.
Author

Steve Castellano
Steve Castellano is a musician and writer living in Toronto, Canada. He holds a music degree from York University, where his focus was electronic music and composition. He currently records and performs modular electronic music under the name Elettronica Sperimentale.