Exploring Melodyne: A Closer Look
- June 23, 2021
- by Steve Castellano
- Product Intelligence Report
As promised in my previous article, we’re taking a closer look at Melodyne, starting with some basic practical applications and then exploring some of its more esoteric features. To get started, I put out the call to some producer friends for problematic tracks to explore with Melodyne – “pitchy stems” was my actual request – and I wasn’t sure what the response would be. Like any aspect of musicianship, pitch can get personal, and not everyone likes sharing their work before it’s finished and sounding its best. Happily, I did get some volunteers. One friend enthusiastically promised me tracks that would “make your milk go bad.” To round out our deep dive, I’ve also put my Wurlitzer 200 under the microscope, and taken some time to get to know the Sound Editor.
Session 1: the power ballad
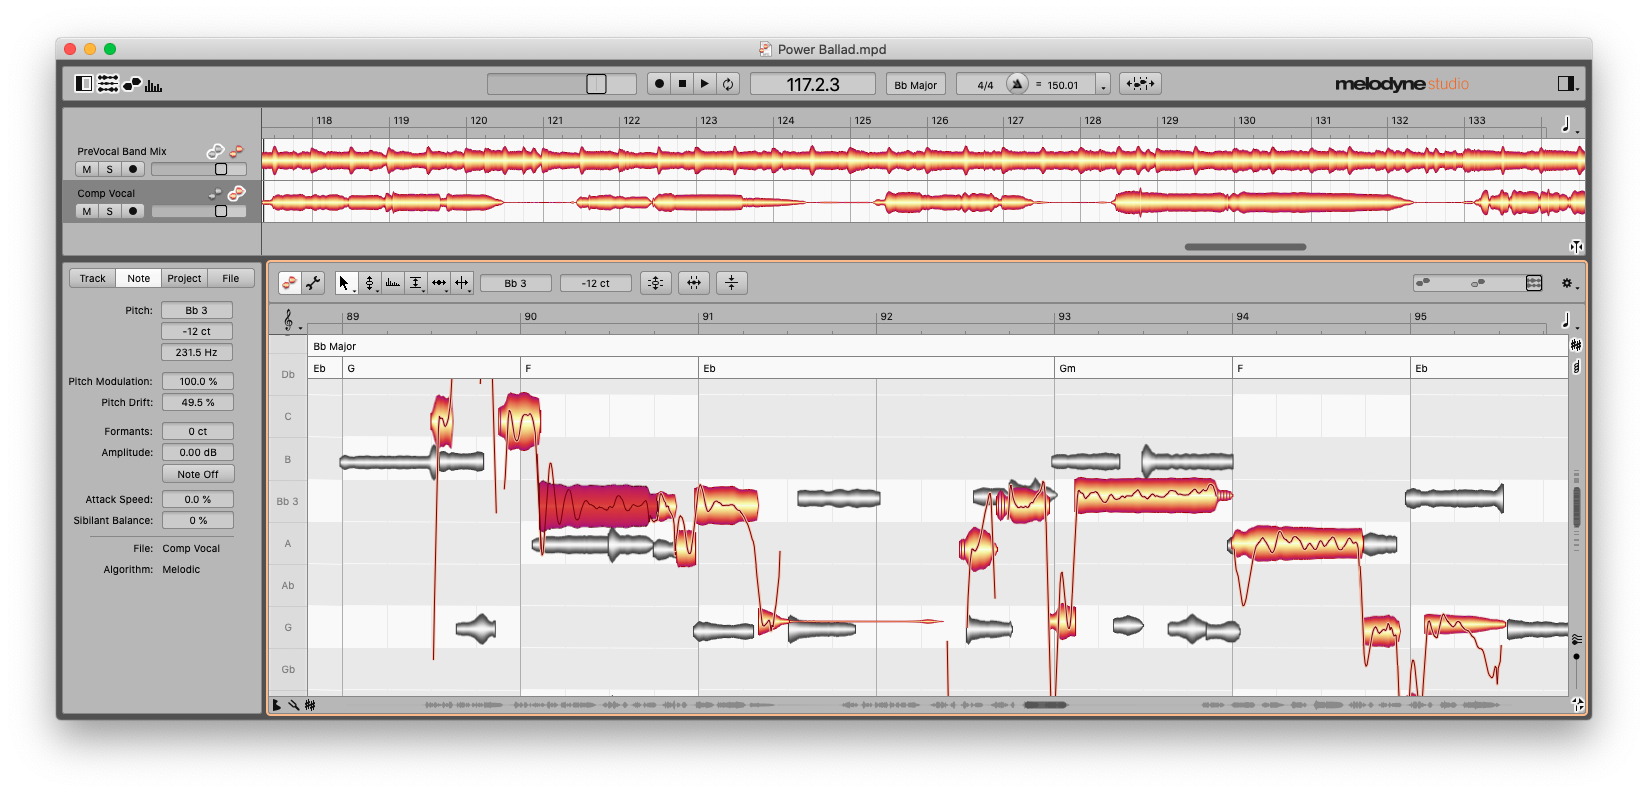
My power ballad example consisted of two stereo tracks: a solo vocal track and full band mix. Melodyne had no trouble analyzing the tempo, key and chord structure, with a couple of minor exceptions. In one case, the harmonics in an open fifth power chord may have suggested a major chord where the songwriter’s intention was clearly minor – easily fixed by typing the correct chord into the Chord Track. I then switched the pitch grid to chord mode so that I could focus on the vocal melody and see how far it strayed from what the band was playing. My first stop was the Correct Pitch Macro, which allows you to pull an errant track (or just the notes you’ve selected) into line with a few quick settings.
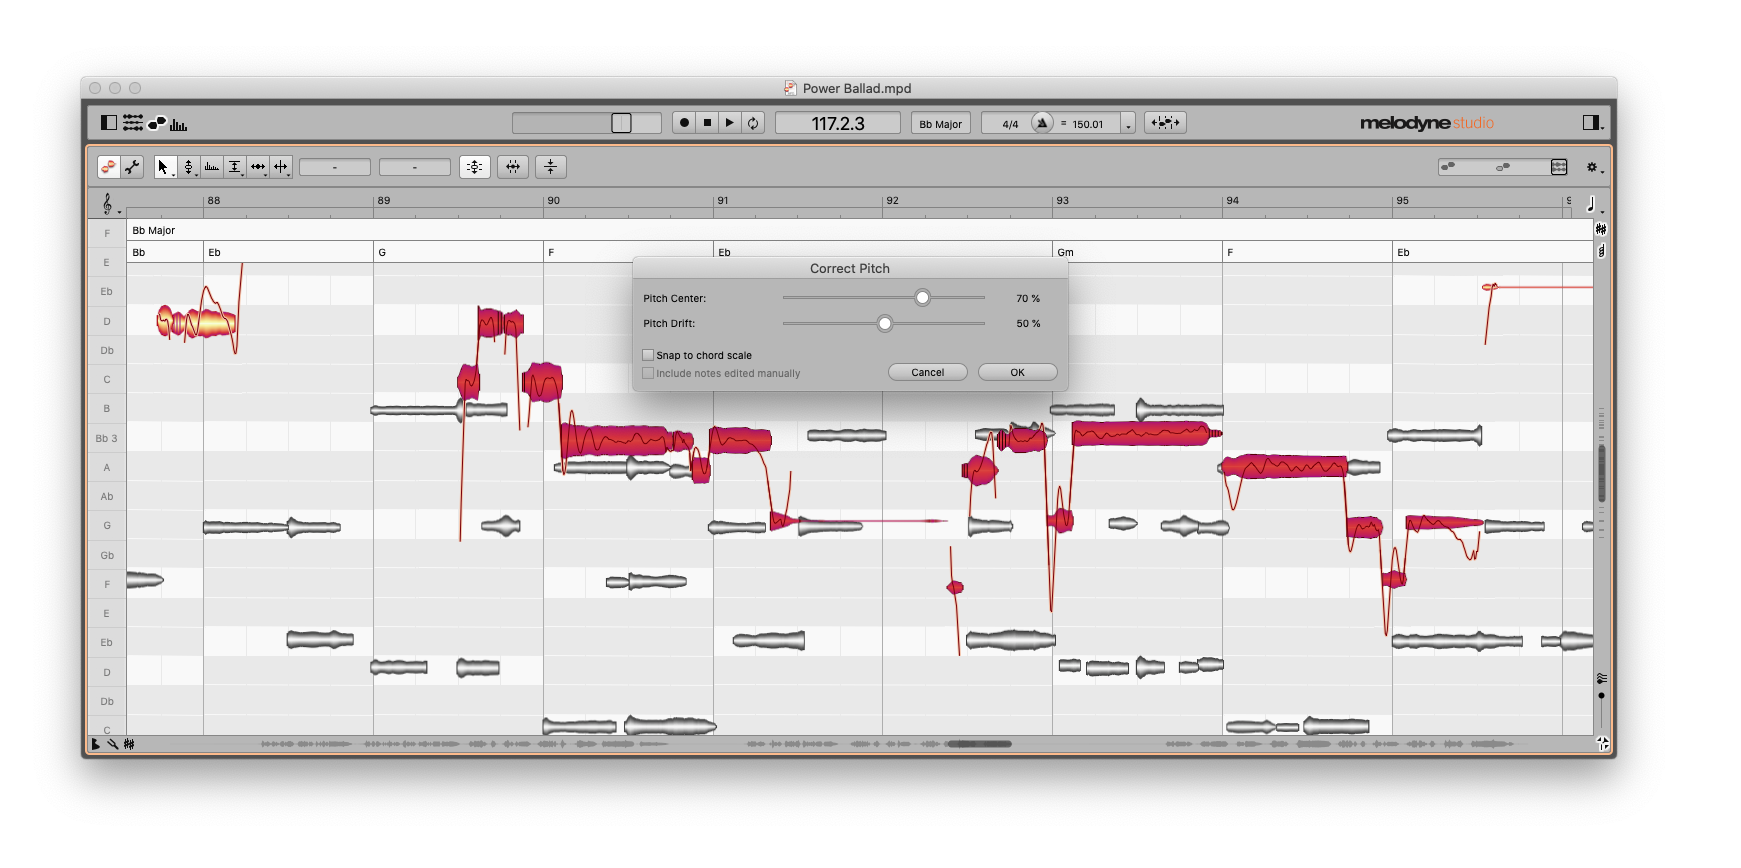
The Correct Pitch Macro puts a lot of power into a few controls. By default, it will correct to the nearest semitone, but you can also select “Snap to chord scale” if the chords have been defined. You can also control the strength of the correction independently for pitch centre and drift. The settings you choose here will vary from one track to the next, and clearly correcting to the chord scale at 100% is a stylistic choice that may not be the best option for every tune. These adjustments are non-destructive, so if you change your mind later you’re free to tweak or revert as you see fit.
In this case, balancing what I think the artist’s intentions were with what I think the melody ought to be, I’ve chosen 70% as the sweet spot for pitch center before proceeding to fine-tune individual notes. This particular vocalist has a particularly wide vibrato at times which the pitch modulation tool can take care of quickly and easily – click once to select a note (or “blob”), then click and drag down to reduce the vibrato to suit your taste.
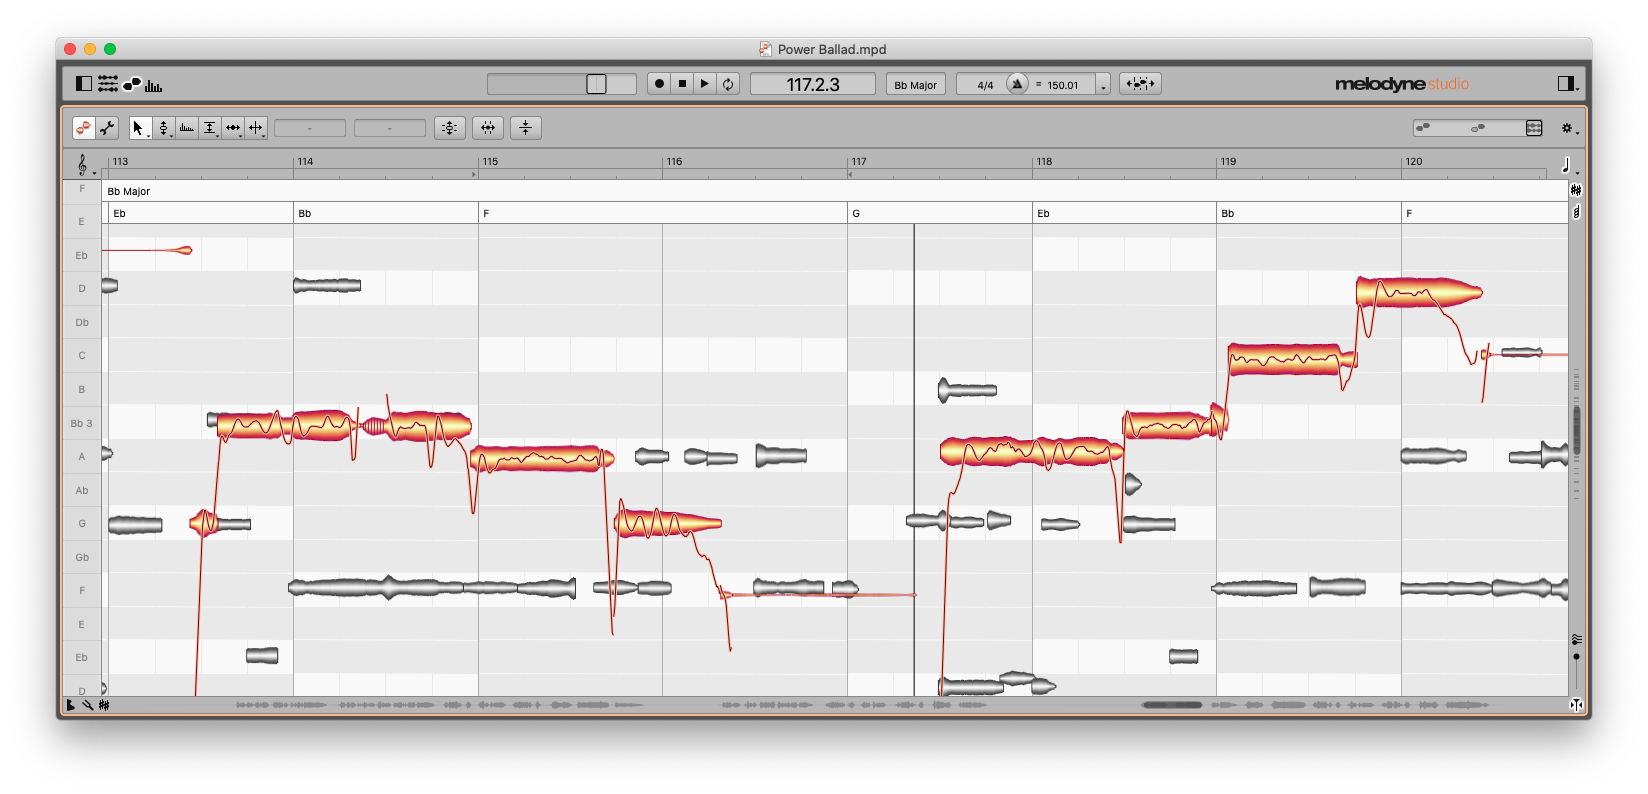
The ability to overlay a track’s melody on top of the chord structure of a tune also makes it very easy to spot issues with an arrangement. Without even listening to the track, we can see that these two vocal phrases aren’t resolving to chord tones (though they are within the chord scale). There are few rules in music that can’t be bent occasionally, but if, as a producer or songwriter, you feel the arrangement isn’t sitting the way you want it to, Melodyne provides you with a clear view of your options. Once you’ve spotted the problem, exploring new melodies can be done in a few mouse clicks.
Session 2: the a cappella hymn
A friend graciously offered me a three-part vocal recording of a Georgian hymn to experiment on. I expected this piece to be a real challenge for both chord and tempo analysis, as the pitch drifted quite a bit throughout, and the score indicated pauses at the end of every phrase. Melodyne did however provide me with a key, and a reasonable approximation of tempo, with bar divisions aligned to note attacks in most cases. I added some key signature changes into the tempo track manually to accommodate for the pauses, but given the fluid tempo I wasn’t too concerned with individual note values.
This style of music did offer some freedom in other ways. The harmony is modal in nature, so key signature alone is plenty to go on. The piece is also sung in rhythmic unison – everyone is singing the same syllables at the same times – so in terms of rhythm all we need to do is keep them all aligned. And this choral style does not favour vibrato, which means we don’t need to be shy with the pitch modulation tool.
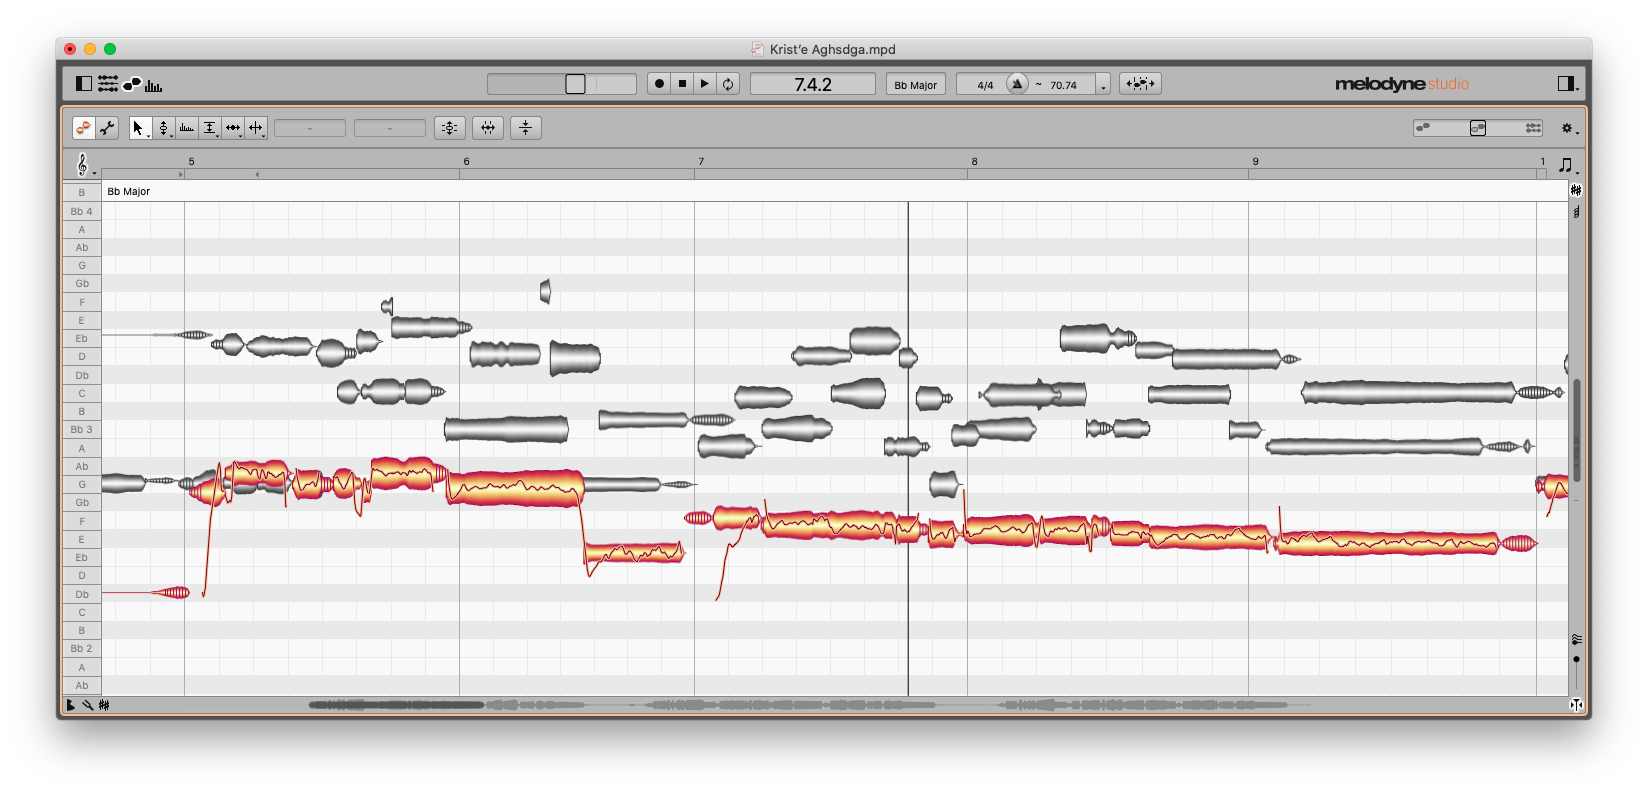
We can see right away that the lowest voice has a tendency to drift flat, so this time I used the “Snap to chord scale” option in the Correct Pitch Macro, to minimize the instances of the corrected track jumping from one semitone to another. You can also see in bar six that the bass voice jumps down a major third, drops in volume and the pitch becomes a bit shaky – we’re all familiar with the tendency of a singer to back off a note they’re not confident with. This is a good opportunity to use the Note Leveling Macro to ensure a consistent blend among the voices. This tool lets you increase the volume of quiet notes and lower the volume of louder ones, respective to the mean amplitude of your selection or track.
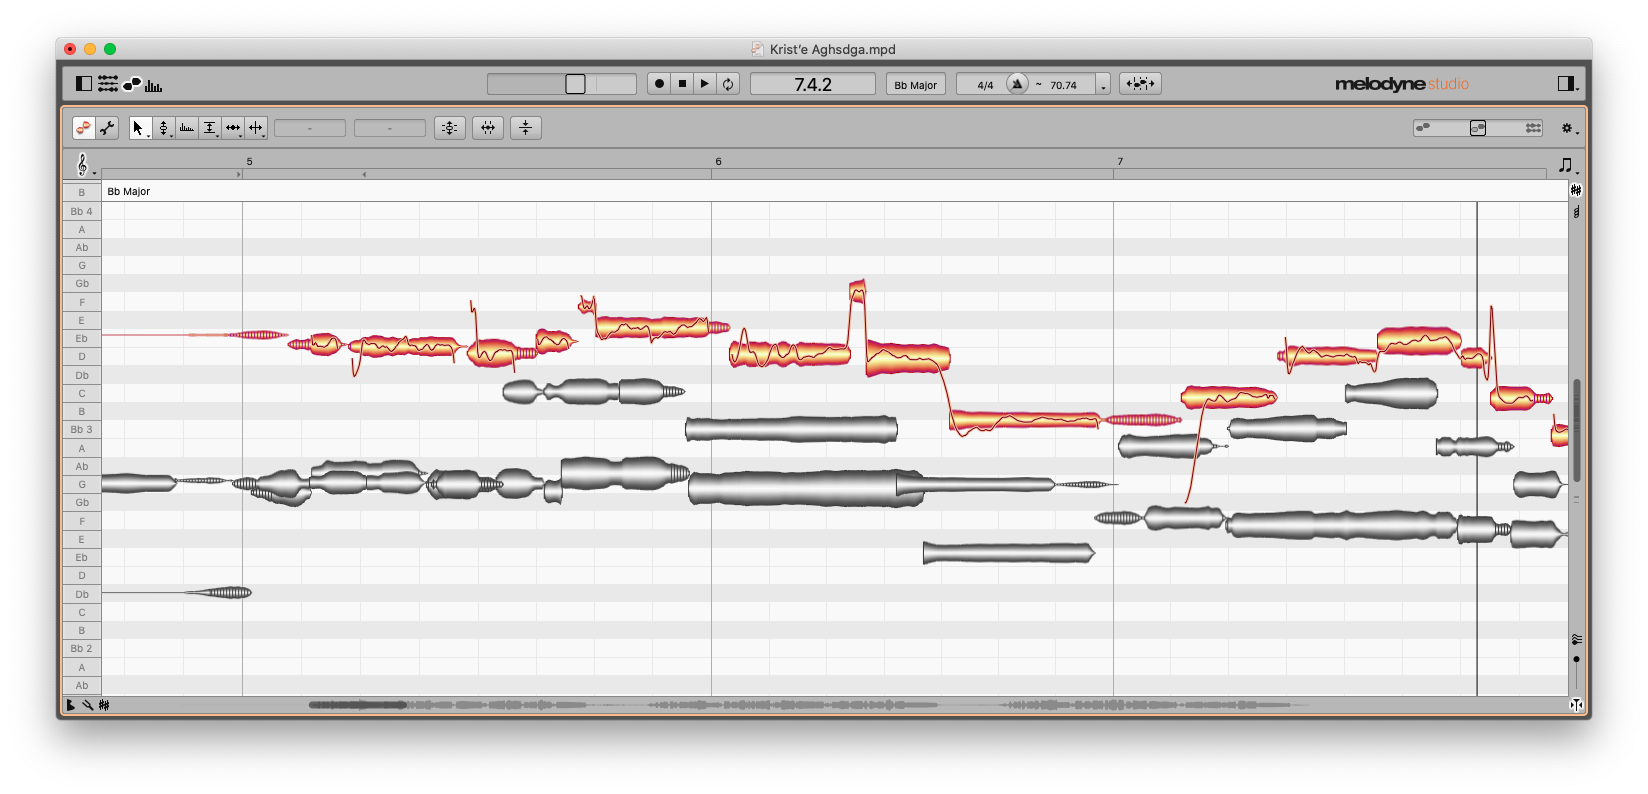
Here we can see the high voice running into a bit of difficulty – they’re clearly at the top of their range, and their voice breaks on the first sustained note in measure six. In most cases we’d want to re-record this, but as I’m here and the singer isn’t, I’ll see if I can patch it. I don’t want to glue these pieces together, as the break created shifts in not only pitch but timbre and amplitude. A better solution in this case might be to delete the break and the blob following it, and, as they’re all the same syllable, use the Time Stretch tool to elongate the first blob over two beats. In the end, as the two upper voices are the same singer, copying and pasting the same syllable from track two and shifting it up a major third was the best solution.
It’s worth mentioning here that choral or a cappella settings are an ideal opportunity to use the Apply Dynamic Just Intonation option, which can be found under the Key/Scale menu in the Scale Editor. Just intonation allows for purer sounding harmonies by tuning intervals to their natural ratios rather than fixed equal temperament, and can result in a more natural sound.
Session 3: tuning an electric piano
Keyboardists tend to worry less about tuning than most musicians (with the possible exception of mallet percussionists), but it’s worth remembering that electro-acoustic instruments like electric pianos do require tuning now and then. And as tuning is best done by a qualified technician, you may end up in a situation where you need to record a track and don’t have time to call in a tuner.
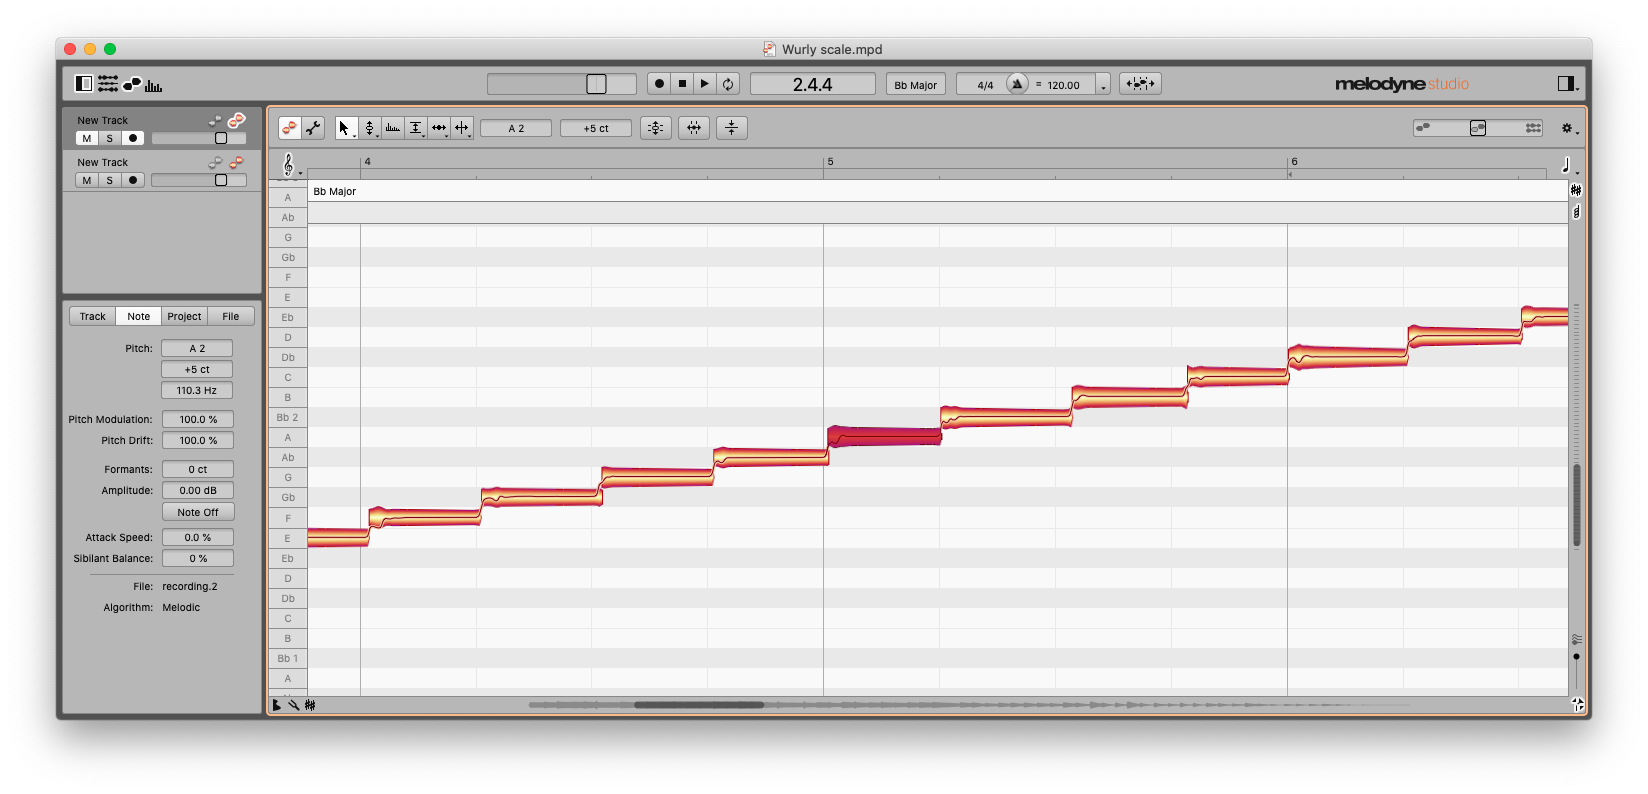
My Wurlitzer 200 has a certain vintage warmth to its current tuning scheme, and upon recording a chromatic scale into Melodyne I can see it may not be quite up to the most exacting standards. Thankfully, re-tuning it after the fact is one of the simplest things to accomplish in Melodyne.
Before making any edits to a polyphonic track, it’s best to review the results of the initial analysis in the note editor to ensure everything has been captured. If you’re hearing notes but not seeing them onscreen, you can reveal “ghost notes” that Melodyne was on the fence about by switching to Note Assignment Mode, which is identified by the wrench icon.
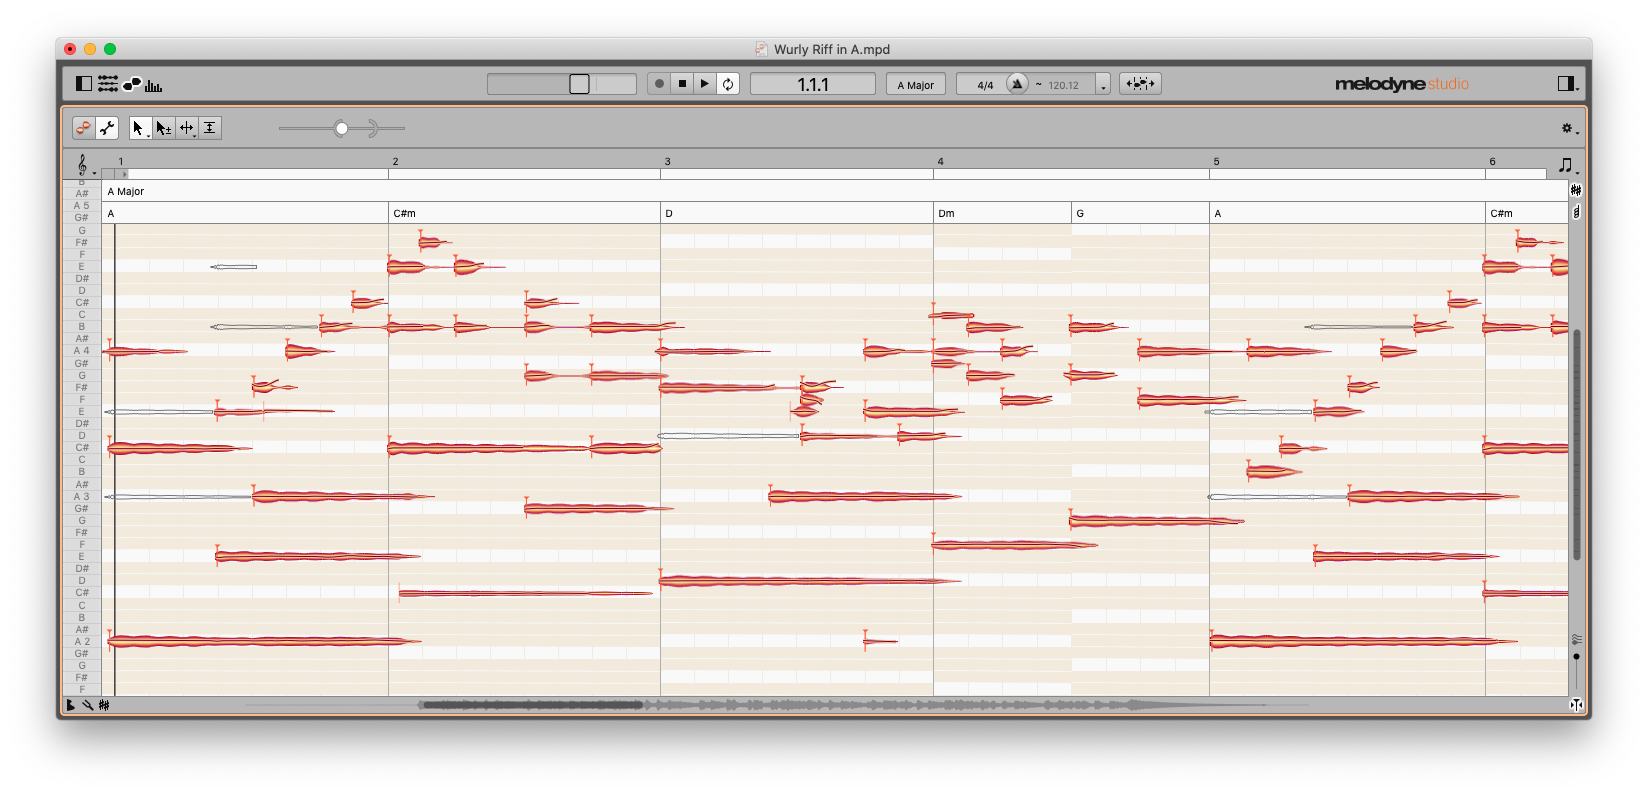
On the downbeat of bar one, I played an A2 that didn’t turn up in the first analysis, but is visible in Note Assignment Mode. The reason for this is easy to understand – there are no overtones produced by A2 that couldn’t potentially exist in the harmonic series of A4, and because they were struck at the same time, it’s difficult for Melodyne to determine whether it’s looking at one note or two. Note Assignment Mode lets you weigh in on these decisions, and double-clicking on a ghost note with the plus/minus pointer will turn it into an orange blob that you can now edit independently.
When we’re satisfied that we’re seeing everything in the editor that we’re hearing in our heads, tuning the entire track is as easy as returning to edit mode, choosing the pitch tool, selecting all and double-clicking one of the blobs. As with our choral example, we’re also free to explore a variety of tunings in the scale editor, if equal temperament isn’t exactly what we’re looking for.
Session 4: working with the Sound Editor
What if, once our electric piano track has been analyzed and edited, we decide that maybe that isn’t the instrument that suits the part best? We could start again and re-record it, of course. We could export the note information as a MIDI file, and replace or double our original track with a virtual or hardware synthesizer or sampler. One of the more exciting sonic options Melodyne offers is found in the Sound Editor window, where we can tinker with the harmonic structure of our original recording in a variety of ways.
In a broad sense, when Melodyne analyzes a track, it breaks each individual note down into its constituent harmonics – the individual pitches, defined by the harmonic series, that make up the sound. The sound editor lets us manipulate those harmonics, as a group, or individually, to change the quality of that sound in subtle or dramatic ways.
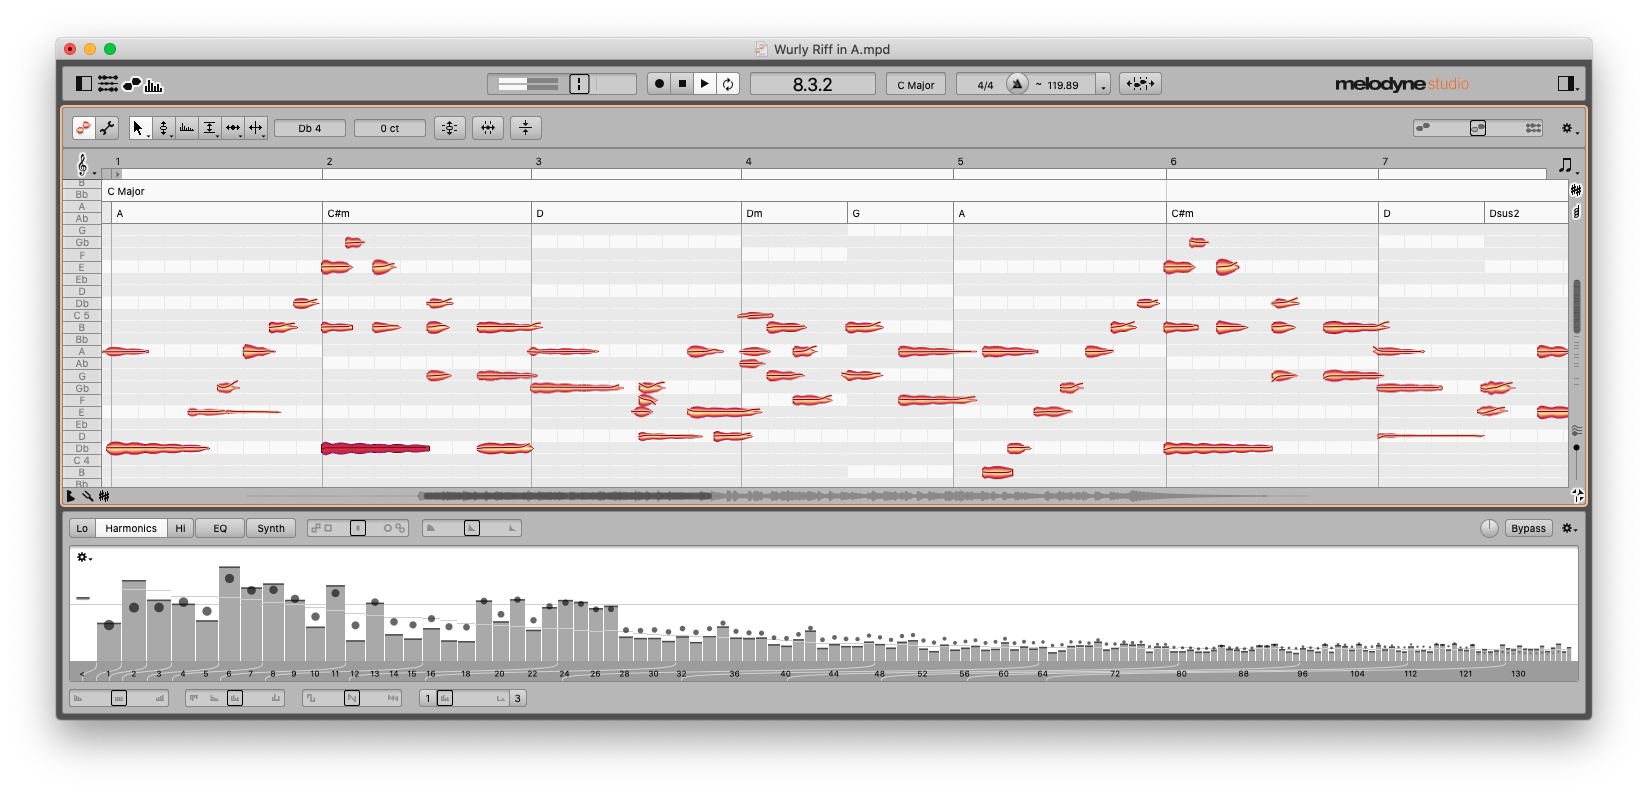
The Harmonics window is where some of the most interesting transformations take place. The display shows us the mean (average) of the harmonics in our track as a series of bars. By dragging a bar up or down, we change that harmonic’s relative amplitude for every note in the track. Four sliders at the bottom of the window offer a variety of options for adjusting the entire series.
Brilliance alters the balance of higher harmonics to lower ones, like a tilt EQ. Contour adjusts the relative height of adjacent bars – you can use it to emphasize these differences or smooth them out. Odd/Even controls the balance of odd and even harmonics. Dragging this control to the left, to emphasize even harmonics, turned my Wurlitzer into a distinctly Pianet-sounding instrument. The fourth slider offers a variety of options for “thinning out” harmonics in a comb pattern. The Shuffle Spectrum function, in the local drop-down menu, provides instant transformations by randomizing the entire spectrum.
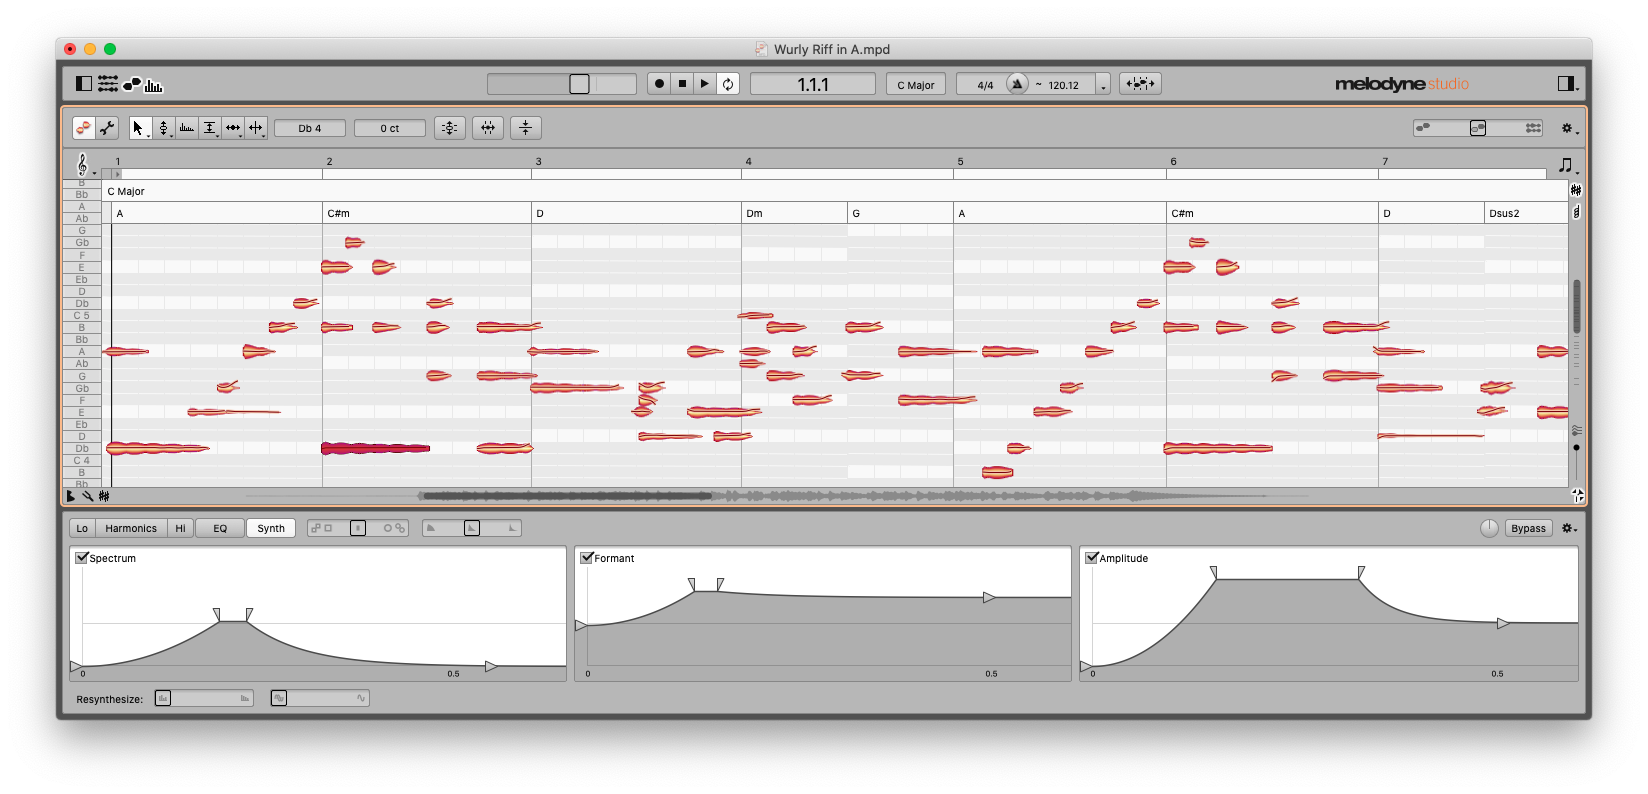
The Sound Editor also includes an EQ section, which provides you with control over frequency bands corresponding to semitones in a chromatic scale, as well as the formants associated with the source material. The third area of the Sound Editor, called Synth, allows you to apply envelopes to shape the depth of the changes you’ve made over time, independently for Spectrum, Formant, and Amplitude.
There’s a great deal of power and potential in the Sound Editor, and the sounds I got out of my simple electric piano track ranged from Clavinet-type sounds with auto-filter effects to bowed, metallic pads.
A versatile production toolkit
Melodyne does a great job of putting user-friendly controls on some fairly complex processes. Within a few short sessions I felt like I had a pretty good grasp on some features that I expected to be arcane and impenetrable, particularly in the sound editor. For the most part, if it ever occurred to me to wonder “is there a way to do this,” I found my answer quickly, and it was usually “yes.”
Melodyne has become synonymous with pitch correction, likely because it does it exceptionally well, and because pitch is a problem that’s often calling out the loudest for a solution. But clearly it is capable of many other tasks, from addressing sibilance, dynamics, and tempo to analyzing the harmony and structure of your tracks – and the Sound Editor is an entire world of sound design to explore on its own.
Author

Steve Castellano
Steve Castellano is a musician and writer living in Toronto, Canada. He holds a music degree from York University, where his focus was electronic music and composition. He currently records and performs modular electronic music under the name Elettronica Sperimentale.