FabFilter Pro•R
- October 5, 2017
- by Frank Heller
- Product Intelligence Report
I have a lot of reverb plug-ins. I only use a few on a day to day basis. The two main elements that make these few reverbs my “go to” units are high-quality natural sounding space creation, coupled with a simple, intuitive user interface.
The FabFilter Pro•R fits the bill and more. This is a great sounding reverb with an uncluttered interface. All the major knob controls, with a few exceptions, are in plain sight, descriptively labeled and perform predictably.
When I first launched it, I was pleased with amount of contextual information that would pop up as I moused over each control while exploring the feature set. If I needed in-depth definitions, that’s where the on-line Help manual comes in handy. I’m a fan of well written “to the point” manuals and FabFilter doesn’t disappoint. It’s informative and uncluttered.
Getting into it
The main screen presents you with three main areas: Preset management (and Help), Control knobs and a set of Equalizers. One for Decay Rate and the other for overall Post EQ.
Rather than immediately diving into tweaking the controls, I ran through the factory presets to get an idea of the sound and feel of the unit. The menu is divided into logical categories: Ambience, Small, Medium, Large, Very Large and Tempo Sync… all populated with a wide range of factory presets sporting no-nonsense descriptive names. There are more than enough selections here to get you going for any material you throw at it.
I tested Pro•R with a wide range of audio material. The simplicity and ergonomic layout of the GUI makes it a snap to adjust the reverb quickly. I shut off the popup Help and picked a few presets to match the audio material and went at it.
The first thing I noticed, as I was mousing the controls, was that there were times when I couldn’t get an exact value I wanted. I found that I could double click any control to highlight a text entry field to enter an exact value.
The Predelay, Input and Output knobs are “hidden” at the bottom of the interface and require a mouse rollover to adjust them. Of the three, I would’ve preferred the PreDelay knob placed up top with the rest of the main knobs.

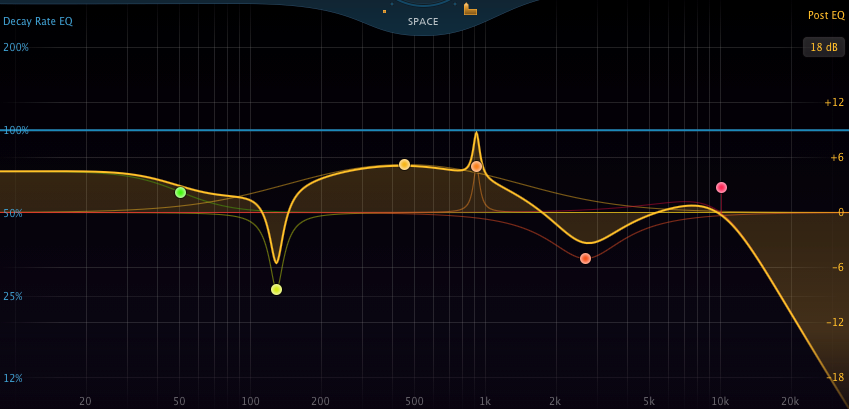
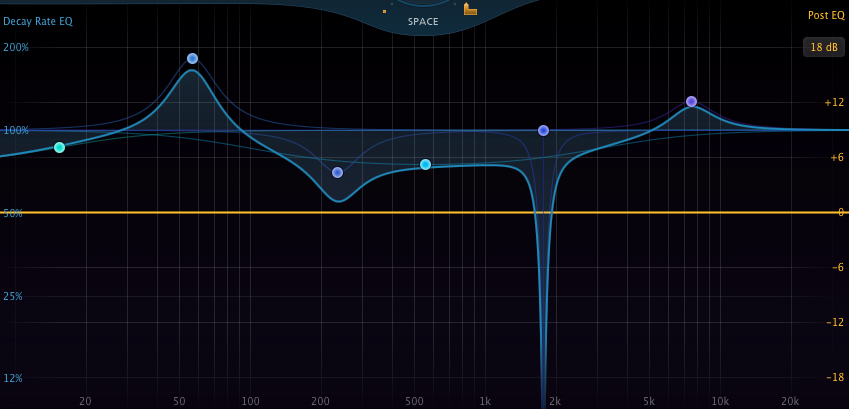
While all the main knob controls dial in the general spatial type needed, it is the Decay Rate EQ and Post EQ that separates the Pro•R from the pack, with its level of precision control over the entire decay response. Most reverbs provide some combination of High pass/Low pass filtering to control the high and low-end decay rates. The Pro•R provides up six bands of EQ (each with 3 selectable curve types) to control the reverb’s decay rate, at those specific frequency bands and a 6 band EQ to tailor the overall reverb output.
The ability to increase or decrease decay rates, at specific frequencies, gave me the ability to get the reverb to sit exactly where it should be for the material it was being used on. I was able to precisely tailor a reverb so it’s perceived decay wasn’t washing out the overall sound with overly long frequency material. And quite the opposite is possible.
This is all great stuff for traditional static reverb setup, but I wanted to see how well the Pro•R could deal with automating the controls and what kinds of sounds were possible by doing so, particularly with the Decay Rate and Post EQ parameters. I wanted to see how difficult or easy it was to get at a sound you wouldn’t expect a reverb unit to normally create.
All of the Pro•R’s main controls are easily automatable, either through assigned MIDI control or host automation. The two EQs can only be host automated because each node has a number of parameters where a one knob assignment isn’t practical.
I started with automating two bands of the Decay Rate on a full drum track. The idea was to knock down the decay of the hi-hat and kick drum whenever the snare was hit. Doing this with a mouse sort of worked but it wasn’t precise enough for me because I moved each band individually. I discovered the Pro•R will let you “link” together any combination of the Decay Rate EQ (or Post EQ) controls by Shift or CTL (Command on Mac) clicking them. This way, I was able to set a curve for each band and control their relative levels, bandwidth and frequencies simultaneously. Another trick I discovered while doing this. Nodes that are set above and below their baselines move in opposite directions when linked together.
But mousing still wasn’t precise enough. I really wanted to hit two exact targets consistently. This is where the Presets came in handy. By creating two presets, one to knock down the decay of the high and low bands and the other to flatten them out, I was able to toggle the two back and forth, using the Preset Menu Up and Down arrows while automating. Later on, I tried a series of 10 changes over the length of a song. For that, I set up 10 presets and clicked through them in order as the tune progressed. This worked well. These presets can be foldered later for storage, as it can make the Preset menu messy. Unfortunately, you have to do this offline. There is no Folder creation or Move to capabilities in the Preset menu.
Working with the Post EQ, I was able to create six narrow band nodes linked together where I swept the frequency left and right. This created a kind of flange/chorus sound into the reverb that gave the reverb a nice movement to it. Rather than sweeping this back and forth over and over the length of the tune, I just automated two bars worth and cut ‘n pasted the automation tracks across the whole song.
You can get a lot of control over each band. The Post EQ provides Level, Frequency, curve type (bell, low shelf, LPF, high shelf and HPF) Q and On/Off controls. The Decay Rate EQ is the same except the curve types are limited to bell, low shelf, high shelf and notch.
I mention this because as you add more and more EQ band moves, it can create a LOT of automation tracks. Depending on how powerful your computer is, this can start to tax your CPU and GPU.
I was able to get a number of interesting movement types going that created spaces I had never quite heard before. Here’s something I set up to shift each set of nodes in one go:

But here’s the thing: you need air to get a sense of space. I was automating solo tracks. As I started to add the rest of the mix in, a lot of my Decay Rate moves started disappearing. Post EQ moves pretty much held their own. You really have to think about how you’re going to present automating this effect on a track or in a mix. It is certainly a tweakers paradise and you could easily spend hours refining an elaborate set of automation moves depending on how many bands you work with. Personally, I take the less is more approach by working with less bands, but if you need move all 12 nodes plus some of the main controls, be prepared for a lot of work.
What separates Pro•R
- Decay Rate EQ controls…discussed in detail above. This 6-band feature is far more versatile than the traditional High pass /Low pass crossover filters found in most other reverbs. Completely automatable, it can create spatial movement not possible elsewhere.
- Post EQ controls. This 6 band EQ has 5 curve types per band. It can statically accentuate or de-accentuate specific frequencies or automate frequency movement, creating subtle or dramatic tonal character to the reverb.
- The Space control coupled to the Decay Rate control. You have to keep in mind that as you increase or decrease the decay time value of the Space control, you are smoothly stepping through a number room models. The Decay Rate control lets you adjust the decay at any particular position (and corresponding room model) an additional 50% to 200% without shifting to a different room model.

You can get a good idea how this works by paying attention to the Space control’s display. In this example, I’ve shifted the Decay Rate from 100% to 75%.
You’ll notice that the Space control shows .24s when the Decay Rate is set to 100%. When the Decay Rate is shifted, the Space control displays the original decay rate below the upper main decay rate, along with the percentage value introduced by the Decay Rate.
- The Character control dials in modulation and early and late reflections. Because of how it treats the frequency content of the ER’s, it is more than a simple chorus unit. Like the label says: it adds character to the sound
- The Distance control: A lot of reverbs have spacing and level controls over early reflections. The Pro•R adds to this functionality by also adjusting the brightness of the ER’s as it is adjusted from Close to Far. This needs to be played with to truly hear how it affects the sound.
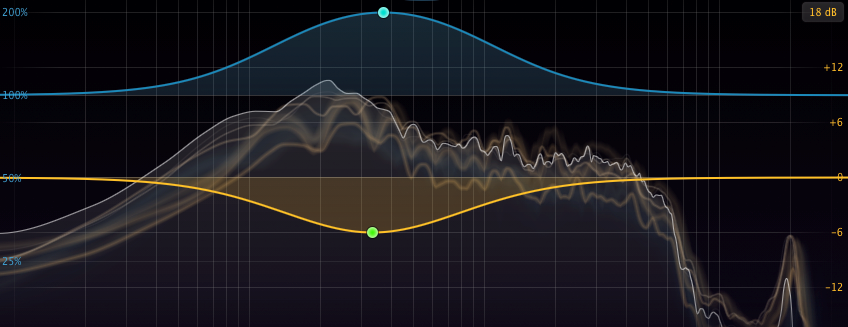
- The Spectrum Analyzer: The Spectrum Analyzer views just adds to the experience with a beautiful visual display with two views showing overall frequency response and reverb decay falloff.

Frank's Nitpicking
I would have welcomed a Left/Right balance “wet” control. Not mission critical because this can be adjusted in the host DAW…. just a convenience.
As I understand it, as you adjust the Space control, you are not only raising or lowering the overall decay time but are also stepping through room model algorithms. I’d like to see some indication of what algorithm is being used at any given position in the knob’s display.
Pre-Delay control rollover on bottom of interface. Kind of hidden for a mission critical reverb function. I’d also like to see the addition of dotted and triplet selections for note values here, as well.
While I like the idea of being able to send 2 or more selected EQ nodes in opposite gain directions (when at least two are above and below the baseline)… it was unexpected. I’d prefer if this behavior required a key modifier.
This unit uses a noticeable amount of CPU. I wouldn’t mind seeing this area improved.
Overall
This is unquestionably the best sounding algorithmic reverb I’ve ever used. It was able to create any kind of static space I could imagine with a smooth realism I could get in my collection of algorithmic reverbs. It’s ability to fit troublesome material, requiring reverb into a mix, was uncanny. Automating its features, particularly the EQ bands, created spatial and tonal movement I’ve not heard before. The amount of detailed automatable control available should certainly appeal to EDM producers and sound designers alike while still appealing to someone just looking for the right space to place a track in.
It’s a beautiful UI that’s easy to understand and operate. Excellent Help documentation. Finally: a great collection of factory presets that show off all the possibilities of control features and room types.
What’s not to like?
Author
Frank Heller
Recording Engineer/Producer from 1970-2000. Digital Interface designer for Mackie Designs from 1998-2006. Digital Artist for Symetrix Inc. 2006-2017. 21 gold & platinum albums, and 2 Grammys somewhere along the way. Lifelong Cubase user and a real stickler for reasonably designed plug-ins.
Presently owner of Weasel-Boy Recording in Seattle.
He's worked with Producers such as Amir Bayaan, Marley Marl, Bruce Forest and Arthur Baker.
He's also worked with Artists such as New Kids on the Block, Madonna, LL Cool J, Stevie Winwood, Earth Wind and Fire, New Order, Prince and Jimmy Cliff